How to simplify your swing
By Luther Blacklock
Let me share a handful of easy drills that will transform your concept of making – and repeating – a powerful swing.
Over the last thirty five years I have been teaching golfers of all abilities to improve their game; a combination of swing theory and improvisation of all the required shots. Basically it breaks down into three familiar areas:
• The address position
• The backswing movement
• The throughswing movement
How to simplify your swing
I am determined that every golfer I teach ends up with an exemplary set-up – it’s just a question of me gently and persistently bullying them until they do it! Most pupils come to me with a strong sense of through-swing and generally have above average hand and eye co-ordination. So, most of my working day is spent with pupils majoring on the correct backswing movement; be they novice, established amateur or tour professional.
This article is designed to give you a concise understanding of how to go about building your most consistent and functional backswing. And I’m going to start by asking you a very important question: “What is the purpose of the backswing?”
If you are not sure then how can you clearly tell yourself and your body what to do?
The worst possible answer to my question would be to say ‘to get in a good position at the top of the backswing’. This poisonous thought is one of the things that keep me in business: how can it possibly be about getting in a certain position when you have 13 long golf clubs in your bag?! You would have to learn 13 positions, one for every club; then there’s halfshots, making 26 positions, three-quarter shots making 39 positions and so on.
The fact is, there never was a ‘position’ in the golf swing until somebody photographed the movement of the swing. So let’s be absolutely clear – the purpose of the backswing is to create power!
If you utilise a sound set-up routine and then create your most powerful backswing, I promise that you will automatically be in the swing “position” that we both wanted. An orthodox swing is the fruit of a great shot – not the cause. I want you to set up perfectly, create power and then focus on hitting your best shot. Let me and your home PGA pro worry about your swing!
How to simplify your swing
Remember, the spine angle provides the axis to your rotation
Work on your posture to create the angles that help you make a good coil
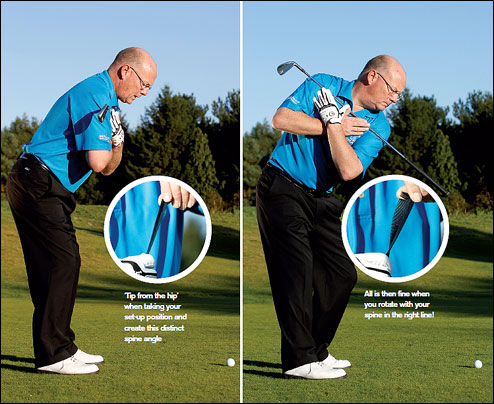
2. All us then fine when you rotate with your spine in the right line!
How to simplify your swing
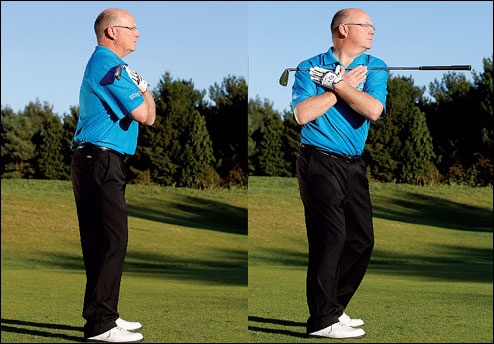
In the inset photos above I am holding my second favourite teaching aid – a nylon comb. (Obviously I had to borrow it as this demonstration doesn’t work with a sponge.) If I hold the straightened comb at the bottom with my left hand and at the top with my right hand, I am demonstrating the correct posture of the spine at address. I am in readiness to twist the top of the comb through some 90 degrees Similarly, here I am holding a 6 iron across my shoulders whilst inclining from the hips. Like the straight comb, my spine is in line, a neutral posture from the top of my head right down to my tailbone. I am inclining forward towards the golf ball in an attempt to imitate the angle of spine for a 6 iron; we must lean forward more for a wedge swing and less for a driver swing.
When I twist the top of the comb through 90 degrees, notice how evenly the load of twisting is spread along the entire length of the comb (inset top right). The stress of rotation is dispersed evenly, this ensures that no kink or stress occurs in a single place. It is this neutral alignment that safeguards the spine: the forceful nature of Tiger Woods’ swing has not caused injury to his spine thus far because of his perfect posture at address.
How to simplify your swing
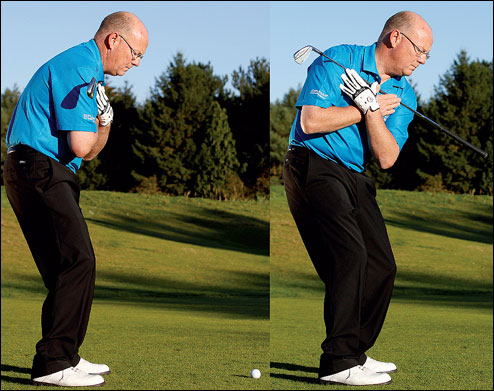
By coiling my shoulders through 90 degrees in the same manner, the exertion of the coil is spread evenly down my entire spine. The beauty of this principle is that it makes understanding the backswing very simple: if the spine is in line everything from your neck down will work automatically! And thus you set in motion a chain reaction – coiling the shoulder line through 90 degrees ignites the following:
• Your torso coils and loads
• Your hips will turn between 30-45 degrees
• Your right knee will move back a hint yet retain it’s flex to absorb the rotation.
• Your weight will shift to favour your right foot at the top of the backswing.
• Your head will stay central, neither swaying, tilting or dropping.
Not bad eh? 5 moves for the price of 1!
Is your golf in a slump?
Rounded, lazy posture destroys dynamics
For the modern tour player regular workouts in the gym are part and parcel of the daily routine – and, for the sake of posture and the coiling motion generally I would urge all of you who are serious about improving your golf to work on basic levels of ‘core’ fitness. It’s easy to fall into bad posture if your core muscles are in poor shape and you are liable to become fatigued towards the end of a round. And it takes only a minor slump to wreak havoc in your backswing and jeopardise your lower back and neck.
How to simplify your swing
Ouch! At far left I am illustrating a typical fault – a slumped posture with the spine clearly arched and out of line. And look at how this minor kink deteriorates into a weak ineffective coil. The ‘loading’ that is normally created by coiling the shoulders becomes concentrated into one place. No longer is the massive load of shoulder coil spread evenly along the full length of the spine (or comb).
As a result of the dramatic deterioration in the backswing movement, we become weak in 5 areas:
• Shoulder coil is less than 90 degrees
• Hip turn is reduced
• Legs become static
• Almost zero weight shift
• Head liable to lateral sway
This clearly demonstrates the damage done to the spine when all the force of the coil becomes focused in one place. The kink in the comb will eventually translate as a trip to the chiropractor if your spine is subjected to these levels of incorrect twisting. The old adage “an ounce of prevention is worth a pound of cure” was never more apt.
Take 3 easy steps for a more powerful coil (in perfect plane)
– this three-hinge drill combines all the moves you need for power
Now you know how to align your spine at address, here is a series of drills that combine to help you develop your optimum backswing movement: it is a mix of three vital ingredients – the shoulders, forearms and wrists. I call it the 3- Hinge Drill, and as I have illustrated here you can rehearse this exercise from a normal posture, inclined forward towards the ball (above), or, in a horizontal mode to help you understand the swing plane more dramatically (i.e. standing vertically).

How to simplify your swing
Start with your arms out-stretched, the hands lower than the clubhead (the toe-end roughly opposite your sternum)
1) Cock your wrists to‘set’ the club up on end, in the perpendicular
2) Rotate your wrists through 90 degrees to turn the club away from the target (as you do this the left arm and clubshaft rise to the plane)
3) Adding the full shoulder turn swings the shaft on a true horizontal plane
It would be good to do a mixture of both, and just 4 or 5 minutes a day will pay great dividends. This drill works so well because it obliges you to utilise the wrists, forearms and shoulders the way nature intended. You will soon realise that the wrist cock, forearm rotation and shoulder coil all load to achieve 90 degrees;
• The shoulders coil through 90 degrees
• The forearms rotate through 90 degrees
• The wrists cock through 45 degrees to leave an angle of 90 degrees between the shaft and left forearm
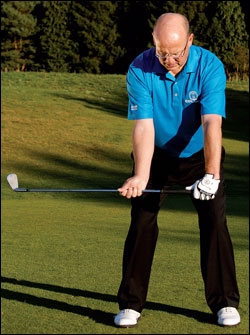
Establish set up and prepare to coil
In both of these sets of photos I have created my ideal posture at address (note the neutral line of my spine). A great way to use the horizontal 3- Hinge Drill (right) is to stand opposite a mirror or a reflection of yourself in a window. Make sure that your torso is absolutely upright and perpendicular. To find your perfect starting position, the clubhead should be opposite the top of your sternum (approximately the second button of your golf shirt). Notice how the hands are much lower than the clubhead and sternum in both cases.
Now for the three-hinge routine:
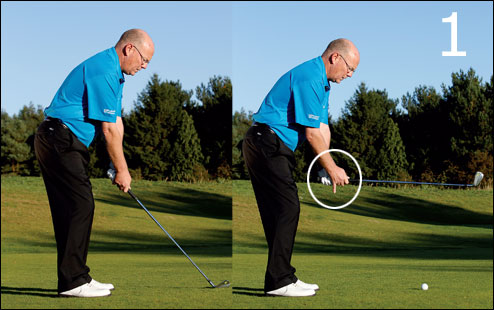
1. Cocking the wrists From the set-up, simply hinge your wrists to 90 degrees – but as you do this make absolutely sure that the forearms remain still. (Note: the 90 degrees is the angle between the clubshaft and left forearm.) Holding that position, I want you to then stick out the little finger of your right hand in readiness for the next power move.
How to simplify your swing
Tip from the hips to create the distinct body angle that characterises a good set-up position
STEP 1: Without moving your arms, cock the wrists to raise the club to this horizontal position – and then point the little finger on your right hand to the ground
2. Rotating and ‘rising to the plane’
Making absolutely sure that the little finger maintains its position, the next step is to rotate your forearms through 90 degrees to your right. It is this essential move that ensures that the butt of the club rises to meet the swing plane. The shift of the clubshaft between steps 1 and 2 is quite significant; in the horizontal drill (right) the whole clubshaft is now in perfect horizontal plane and aligned exactly opposite the sternum. If you do this drill (sometimes called the ‘Pre- Set Drill’) and don’t allow the butt of the club to rise, you will swing too flat, getting the club too far behind you and over rotating the forearms in the backswing. This might cause the odd mystery shank, so beware my tartan clad hero… (some useful I.P. for my favourite I.J.P.!)

How to simplify your swing
STEP 2: Keep that little finger in position as you rotate your forearms to point the clubshaft to the right, a 90 degree move
STEP 3: To complete the sequence, coil your left shoulder under your chin to reach this sound backswing position
3. Coiling fully within the plane
The final step in both of these drills involves making one more vital move – in step 3 we must coil our left shoulder under our chin as fully as our physique and posture will allow. As I explained earlier, as a result of doing this many good things now happen automatically:
• The shoulders coil to their max
• The hips coil through 45 degrees
• The right knee moves back just a tad, but retains it’s flex
• You coil about a constant axis as the head remains central
• The length of your backswing is pre-determined
Of all the things to teach in golf, I consider the correct shoulder coil to be the most difficult. By breaking the backswing down into three easy pieces, it is easier to understand how each of the three key components function.
‘Rectangle drill’
Try this to strengthen your shoulder rotation
With the hands separated on the club you can see there is a perfect rectangular shape between your shoulders, arms and clubshaft. Thus we prime what I call the ‘Rectangle Drill’, one of the best ways to go about strengthening your turning motion. In the main image you can see that I have completed my backswing with a full turning of the shoulders. From the starting position, my primary thought is to initiate the backswing with the left shoulder and drive it into the slot across my throat.
How to simplify your swing
[Repetition of this exercise can help you to avoid making one of the most common faults in golf – i.e. starting the club away with the hands/arms working independently, leaving the shoulders behind.]
Starting the backswing with the coiling motion of the shoulders (and not with the hands) is the key that led to me inventing the Explanar Golf Training System (utilising a heavy roller in place of a golf club, the player using the apparatus has no option but to initiate momentum with the shoulders).
The swing is a difficult thing for all of us, because we are trying to coil athletically, like a discuss thrower, yet, retain the balance and poise of a snooker player. But if you will spend just a few minutes a day on these drills – the two options of the 3-Hinge Drill on the previous page and the Rectangle Drill you see here – I guarantee you will see a significant improvement in your power and accuracy.
You probably have just one question – “Luther, now you have got me here, into a powerful backswing position, what do I do next?”.

How to simplify your swing
The answer is straightforward: you unwind and release the power you have created via the hands, particularly the right hand, as you create the shot you want to hit. ‘Is it really that simple?’ I hear you ask.
Yes, it really is that simple – but simple doesn’t necessarily mean easy! I hope to see you on the fairway sometime soon – but a lot farther down that fairway than ever before!
Originally posted in 2011

Simon Bale
The editorial team at Golf Today strives to provide readers with captivating content that celebrates the rich heritage and exciting developments in the world of golf. Their collective expertise and dedication ensure that Golf Today remains a premier destination for golf enthusiasts seeking the latest news, insightful analysis, and engaging stories from the world of golf.