By Jonathan Yarwood
The following exercises are designed to help you trim the fat off your iron shots – to crisp things up and leave you with a better sensation of striking down and through the ball. To do that, the focus throughout is on synchronising your arm swing with your body turn and generally making things more efficient using width, leverage and torque to create an efficient, modern movement.
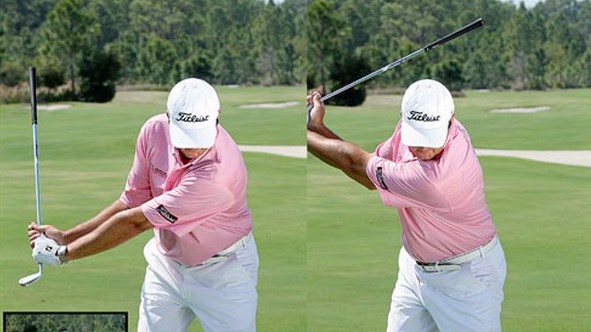
Starting with this training ball, I want to get you thinking about the way in which the forearms in a good golf swing rotate and stay pretty much ‘pinched’ together. In contrast, a lot of beginners and higher handicappers tend to spread their arms and lift them to the tiop of their swing (opposite) which breaks the linkage between the arms and torso. If you can keep the arms rotating and pinched together whilst progressively setting the wrists against that, you will enjoy better width, build up greater torque and – ultimately – clubhead speed.
One thing I will stress throughout this feature is that you don’t need a long swing that runs beyond the parallel; in fact, a more compact swing is more desirable.
Biomechanically it is proven that the key is to improve the kinetic link between your arms and torso – and I’m all for the appliance of science.
Working on your swing with an impact ball or a slightly deflated beachball/football can make a lot of good things happen very quickly. The key throughout the movement that you see across these pages is that with the help of the ball I am not only encouraging the arms to work better together but also in harmony with the body. Starting at the set-up, the arms are relatively close together but they are not tense – and that’s key.
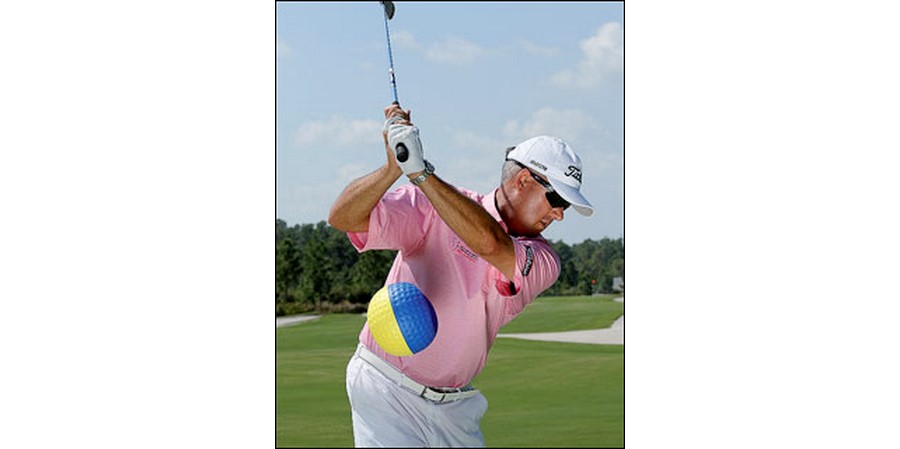
Moving into the swing your goal is then to create width and leverage – exactly the same thing as Tiger, Rory and Lee work on achieving. Rather than focusing on the left arm I want you to feel what the right arm is doing all the way to the top: a sense of keeping the right arm straight, arms together, combined with leverage in the wrists while you turn your upper body against the resistance in the legs will produce this solid, threequarter length backswing position – one with the look of a catapult loaded and ready to fire.
Power leak!
For those of you who focus on the left arm in the backswing, this is the big danger: in a poor swing the arms can often be seen to splay apart, leading to this inevitable ‘lift’ which causes the‘over the top’ move on
the way back down to the ball – a huge power leak. So turn the page to find out how you can eliminate this and start to enjoy a more compact and more energy efficient action
Arm/body coordination drill: Think ‘width’, think ‘leverage’ and think ‘three-quarters’ for a more efficient backswing movement
Starting at the set up, the first thing to to focus on implementing is a real sense of ‘athletic balance’ as you stand over the ball and prepare to move. In other words, you want to establish a ‘ready’ posture. With your weight on the balls of your feet (like a goal-keeper ready to pounce for a penalty save) you bend from the hips to create a good spine angle, allowing the arms to hang freely. With the impact ball in place the arms are immediately engaged and ready to work together during the swing, in tandem with the body.
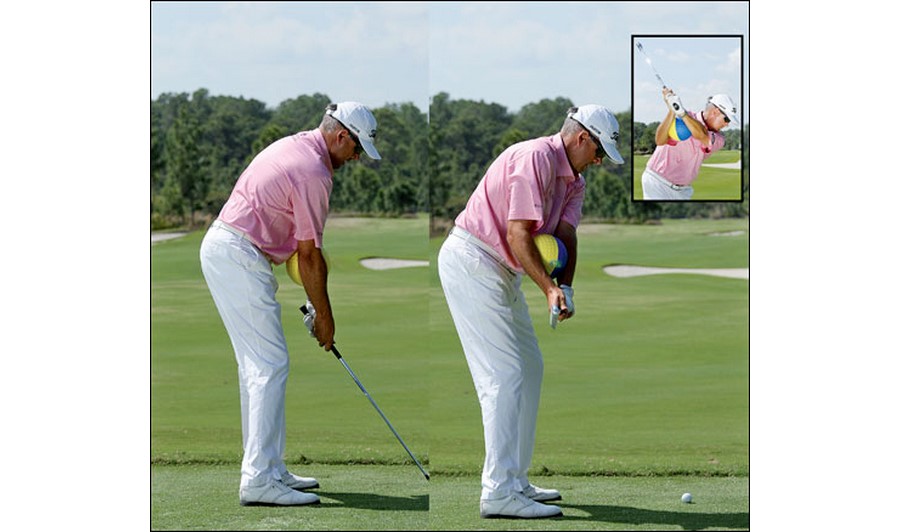
(Right) The clubhead, hands and arms move first to reach this useful checkpoint– note the subtle rotation in the right forearm to achieve this
(Inset) Once you have safely negotiated the first move away from the ball, as the wrists complete their ‘setting’ the rotation of the shoulders completes a solid backswing
Frame 2 (above right) remains one of the best checkpoints you can make at the start of the swing, and to get here the forearms and the club move first; with a subtle rotation of the right forearm, the toe of the club works back and inside the ball-to-target line – look at how the club is toe-up when the clubshaft is parallel to the line across my feet. That’s a popular checkpoint and a good one.
At the same time you can see how the left arm is gently riding across the chest, starting to create width. Remember, the arms and the club have a longer journey to the top of the backswing than the body, and so they have to be the first elements to move before the body starts to coil. (You’ll notice that up to this first checkpoint the shoulders/upper body remain relatively passive.)
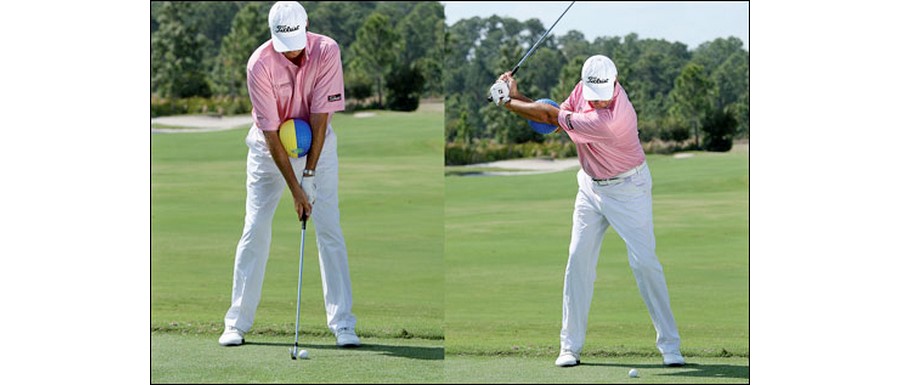
(Right) Feel the width in your swing is created with the right arm, not the left, while the wrists hinge to add leverage
The training ball I am using here is called an impact ball, and has little scalloped areas on either side allowing the arms to fit quite comfortably (equally you could use a deflated beach ball or soccer ball to achieve the same effect). And the influence on the movement of the arms is immediate as long as you keep the ball in position – you will be aware of a tremendous sense of togetherness as the arms move the club away from the ball in this wonderfully coordinated move-away. Having successfully negotiated that first checkpoint, it’s then a case of allowing the wrists to add the essential hinge while you now begin to really involve the upper body as you rotate and coil your torso. At the top of the swing you can see how the club is short of parallel, the arms still close together in a neat balanced triangle. This could be described as a ‘three-quarter’ swing, and the fact is that for a lot of tour players out there today this is as far as they go with their irons. Think ‘wide and three-quarters’.
Because the arms have worked correctly there is no need for ‘lift’ or independent arm motion to reach the top. The left thumb is under the shaft and supporting the club while the hands are above the tip of the right shoulder – a position I would describe as being ‘in front of you’ at this point. (Many people think the hands should be deeper than this – I am not a big advocate of that, as I feel it only makes the hands track into a steeper position coming down.)
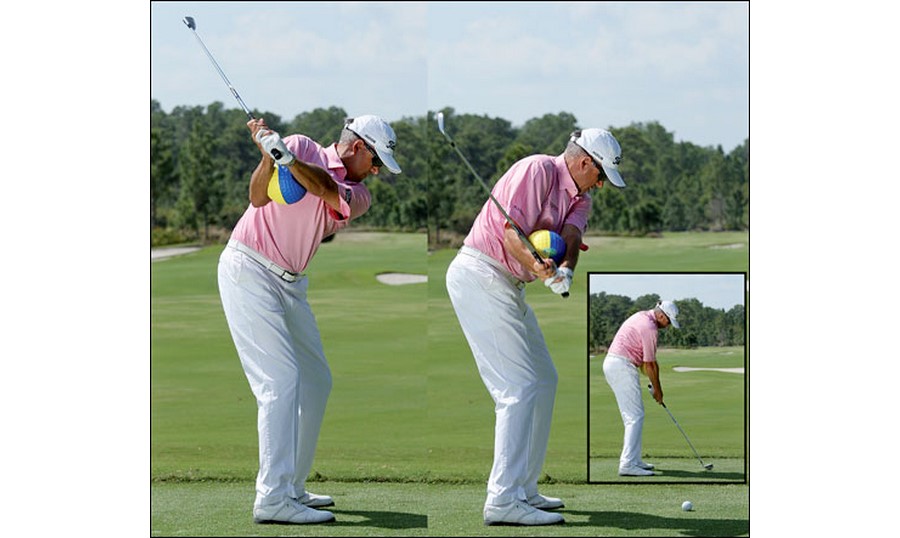
(Right) Club on the right forearm coming down, with neutral clubface, allows you to simply turn your body through impact. Note that posture remains same as at address
Starting back down (above), see how the left arm has worked down the chest into the desired shallow delivery position. This helps guide the club on a consistent plane all the way back down to the ball, and keeps the left arm linked to the fast-moving torso. All of which helps to transfer energy efficiently, thus maximising speed. So you see there really is no need for a long, looping backswing; think ‘width’, ‘three-quarters’, ‘catapult’, ‘speed’ and ‘strike’.
Swish drill: Synchronise your hinge, turn and release for greater swoosh speed
A good golf swing is a combination of sequence and torque to create speed in the clubhead. That’s the bottom line: as a result of the centrifugal forces you generate with the rotation of your body, and the associated free-wheeling of the arms and hands, you produce real speed in the clubhead through impact.
And the drill you see me demonstrating here is one that can help you do that – and it’s especially beneficial for juniors and lady golfers, because when you turn the club around and grip it just below the hosel it feels so incredibly light in your hands.
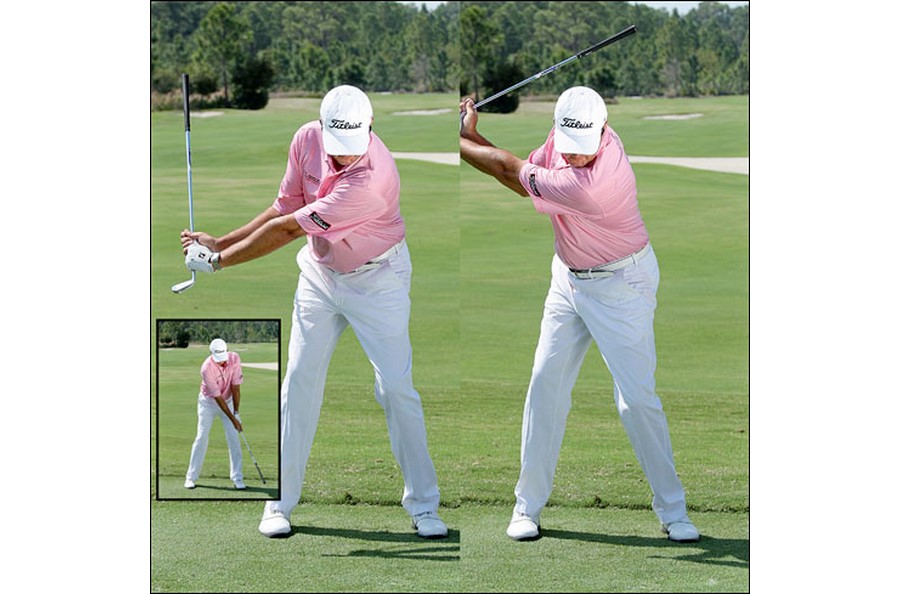
(Right) Three-quarter backswing with 100% efficiency: note that while the shoulders are turned through 90 degrees the hips are barely at 30, the right leg serving as a ‘post’, braced to provide resistance
As per the sequence above, your starting point – once you have set yourself up with a good posture – is to move the grip-end through to 4 o’clock on an imaginary clockface (inset above left). Doing this simply gives you a little early momentum as you then let your arms (and clubshaft) fall back and continue on into the backswing movement. And the key to doing this is that you really ‘snap’ the wrists to hinge and ‘load’ in the process of coiling your backswing.
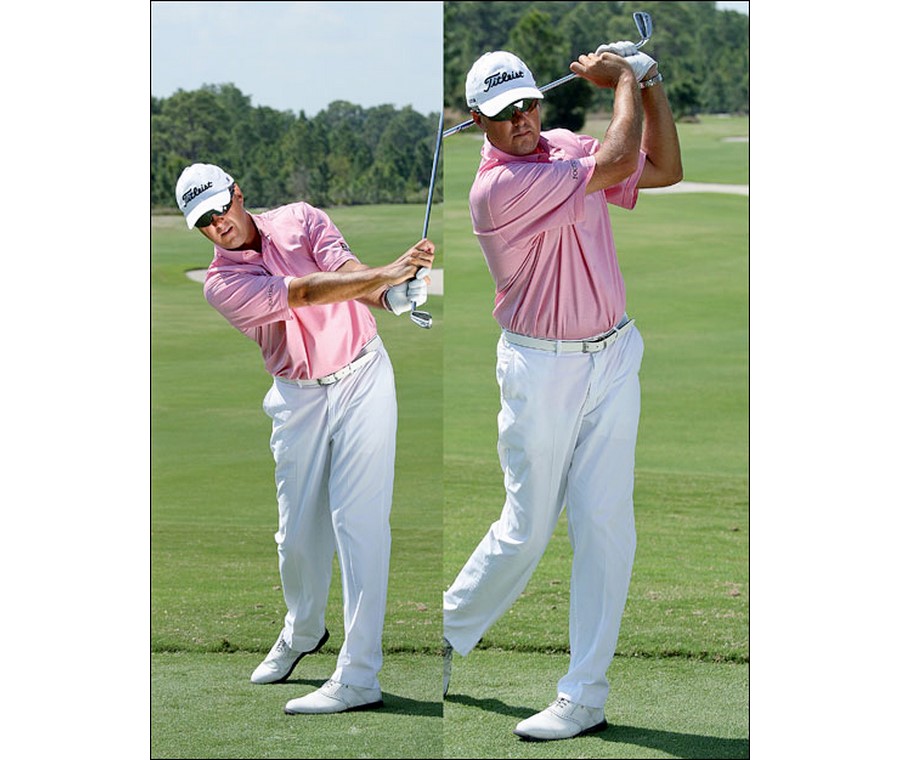
(Right) Use this exercise as a warm-up before hitting balls or playing. The louder the swoosh the more speed you are generating through the impact area
Look how solid the body looks in frame 2 above – the upper body has been pulled around by the swoosh of the club. There’s not too much turn, just the right amount at the completion of what is a very efficient three-quarter motion – and one loaded with energy. I am a big fan of drills in motion, and working on this exercise really does gel together so many of the key ingredients you are looking for in a good golf swing. As you unwind, focus on re-hinging the wrists to make the distinct L-shape you see here in the through-swing (right). To further accentuate the role of the hands and arms, try it with your feet together and let the clubshaft create the maximum swoosh.
Fluid motion: Make like a baseball pitcher, and step into a great downswing…
In wrapping this up let me stress again here the importance of fluidity and dynamic motion in a sound golf swing. Think of these qualities as the glue that holds it all together. That’s why a player like Jim Furyk has such a great swing – he does not fit any model of a textbook player, but the fluidity of his motion is so good that he is able to repeat a solid impact position time and time again.
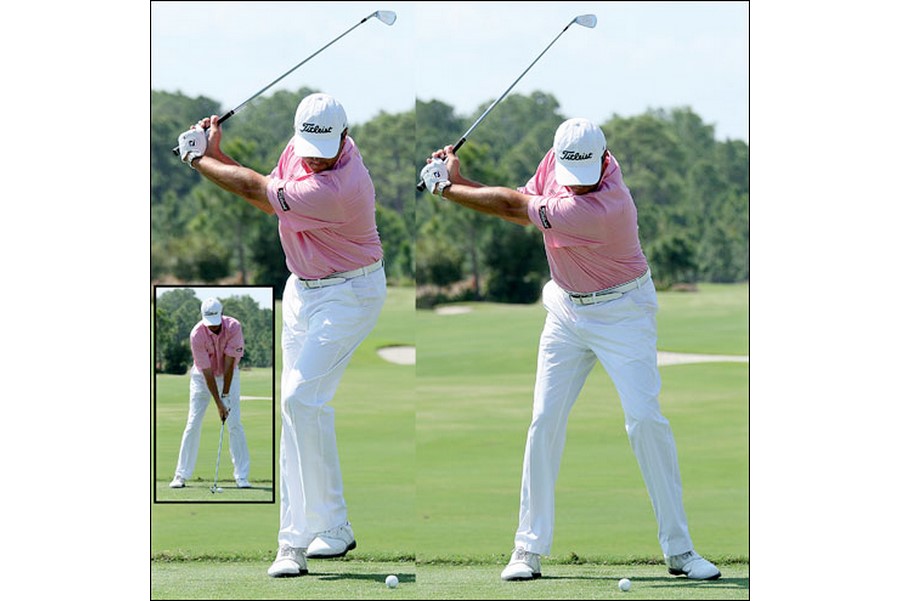
(Right) STEP INTO THE DOWNSWING – Then, just like the baseball pitcher, use the re-planting of that foot to signal the change in direction as you shift into the downswing
This final drill is one of my all-time favourites – because it’s all about fluidity of motion. The idea is that as you make your backswing you simultaneously lift your forward foot up like a baseball pitcher on the mound preparing to launch a fastball. To cue your change of direction, you then use the re-planting of that foot as the signal to unwind and rip your body through the shot; as you plant that forward foot, I want you to feel your weight going onto your left toe as you shift forward. Once you can feel it there you are free to rip your body through and finish on your left heel. Doing this can be quite addictive on the range – and I think you’ll be surprised at just how well you strike the ball doing it.
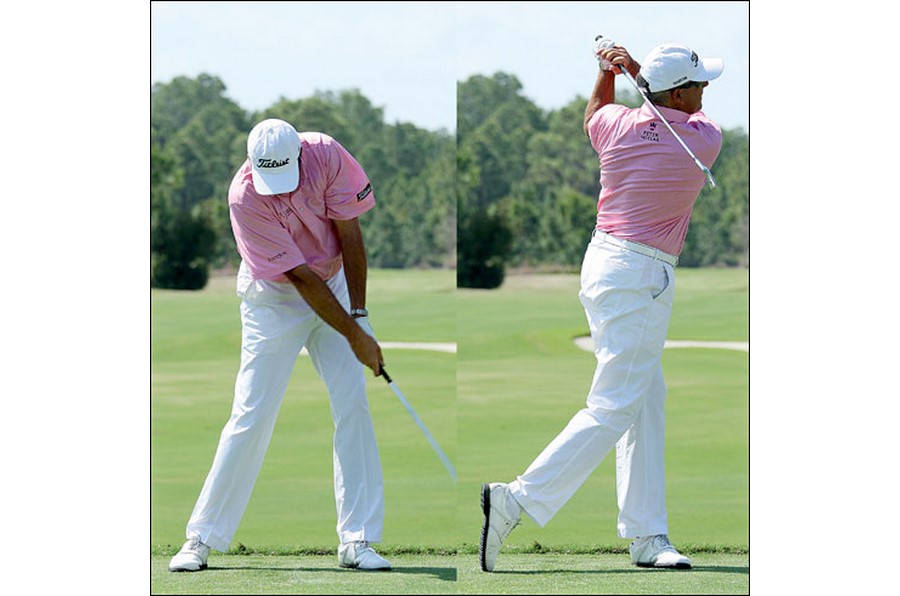
(Right) BALANCE & HOLD – Free-wheel to a full finish and hold your position for a few seconds
Congratulations, you have just experienced the modern moves based on biomechanics and efficient principles of motion. Keep working on these three or four key elements to get those irons ripping off the face. The lifeblood of great golf swings, from Jim Furyk to Rory McIlroy, the common denominator is creating a dynamically efficient motion. Dynamics and synchronisation is the glue that holds all good golf swings together and makes them work. Don’t get obsessed with positions in your movement, focus instead on the fluidity and flow of your motion all the easy from start to finish.
