We’re all well aware of the importance of putting – but how often do you really put in some serious effort on the practice green? Let me give you a strategy covering four key perspectives: technical, tactical, practical and co-ordination. Whatever your standard of golf, I’m certain that one or more of the drills within each of these sections will inspire you to better putting figures and consistently lower scores next season
Dan Frost
Technical
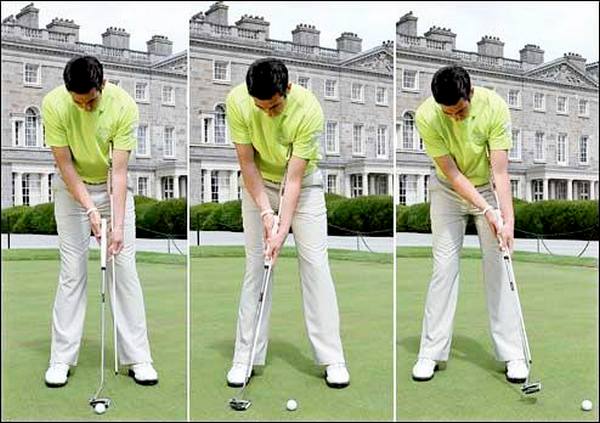
1. Aim the pistol for a perfect hold
Confused about how the grip of the putter should run through the hands? Let me kick off with a simple way of finding a good hold, running the grip correctly through the lifeline of your hands. This will help you to create the correct relationship between the hands, wrists and posture in a simple manner.
Step 1: Secure the grip into your top hand as you would if asked to aim the putter as if you were pointing a pistol in front of you.
Step 2: Find a good relationship with your low hand. (I say high and low because as you can see I predominantly prefer the left-below-right grip, whereas for you it may be the other way round.) You should now get the sensation that the club is sitting in the lifelines of the hands, the top of the wrist bone is slightly inverted and there is a line forming between the club shaft and the forearms.
Step 3: Now simply keep this relationship and slowly tilt forward from the hips until the sole of the putter touches the surface of the green.
Step 4: All you need to do now is find nice balance through your feet with the weight nicely in the middle and knees slightly flexed. Notice how I have kept the relationship formed from my hold through my forearms.

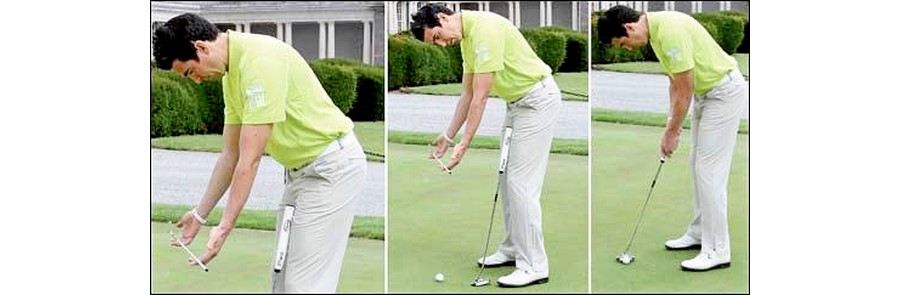
2. For consistency of stroke, train your shoulders to govern a true pendulum motion
‘Rock your shoulders’ is a phrase that most of us have heard on the putting green and yet very few club golfers actually achieve a pure shoulder-controlled pendulum stroke.
The problem, of course, is that it’s all too easy (and instinctive!) to want to use the hands and wrists – after all, you are holding the putter in your hands and fingers. But for control and consistency we must start higher up. The key to creating this superior pendulum motion lies in adjusting your focus, so that you feel the momentum of your stroke originating from the shoulders. Here’s a drill that can help you:

Step 1: To isolate the movement of the shoulders trap a cane between your upper arms and the top of your chest, allowing your arms and hands to hang down towards the green
Step 2: Next, form your regular grip trying not to add too much tension to the hang of your arms
Step 3: Comfortable in your starting position, initiate motion by making the cane work up on the backswing and down in the throughswing.
Step 4: Make sure you hold your finish to show control and to familiarise yourself with the feeling that the hands have been relatively inactive.
3. Left-side is king
Maintaining the symmetry of the relationship between your left shoulder, arm and puttershaft is one of the easiest ways to transform the consistency of your stroke. Most club golfers tend to break down their wrists through impact in an attempt to re-direct an already failing stroke. To build a solid action, try this drill:
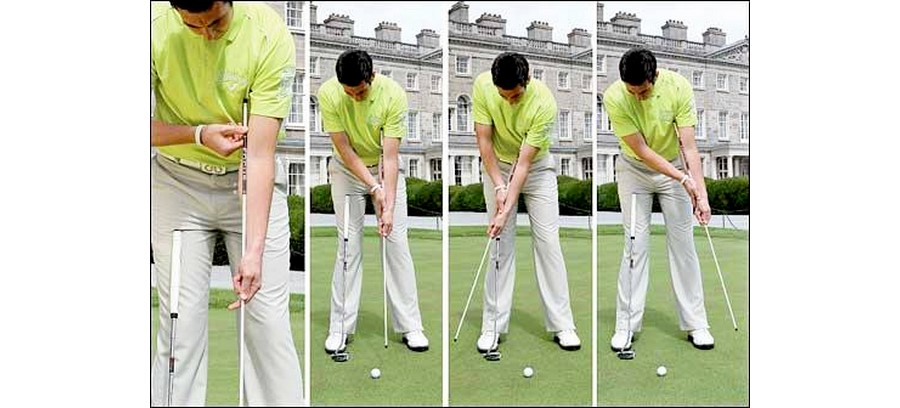
Step 1: Take an alignment stick and place it up the inside of your left forearm to just above your elbow.
Step 2: Hold the stick in place by applying your right hand in a grip like formation. Same again, if you are orthodox in your grip (i.e. right hand below left) feel free to do this in the same style.
Step 3: All you need to do now is rotate your shoulders whilst keeping the cane touching the inside of your left forearm as you rehearse your stroke.
Step 4: Once you have a good feeling of control over the cane, introduce your putter alongside so that the putter pushes the cane against the arm.

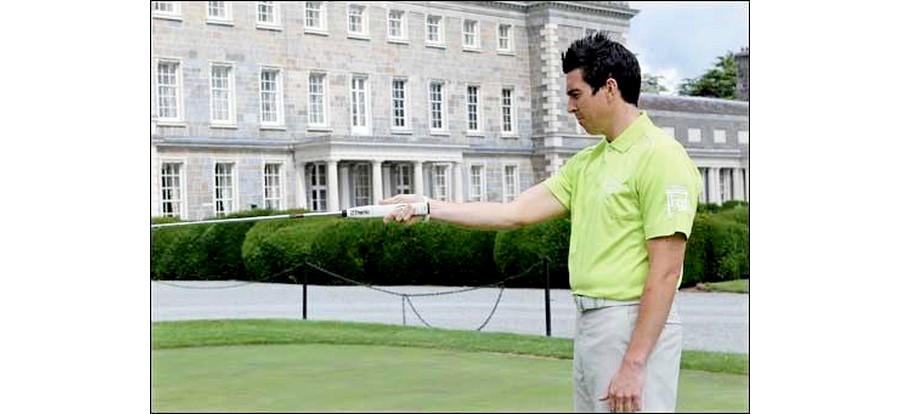
4. Make sure that eyes and shoulders align with target
One of the most neglected fundamentals in putting is making sure your eyeline is parallel with the roll line (some players like to have their eyes directly over the ball, others slightly inside – up to you to find your preference). It is hard to appreciate the necessity of getting this position right unless you try this drill. If you position your eyes correctly you will have no problem relating to the target line and visualising each putt.
Step 1: Place a cane in your finger tips and allow your arms to hang down from a balance posture position so that the cane is pointing along the intended roll line.
Step 2: Position your eyes so that with a simple tilt of the head it is easy to look straight down the intended line.
Step 3: Replicate the same feeling with the putter in your hands. You should get a good sensation for alignment and your eyes being right over the top of the ball.
5. Quiet legs, stable base
As a junior I used to love going to tour events at Wentworth and watching the great stars working on their games. I can particularly remember watching Nick Faldo on the practice putting green and being struck by just how ‘solid’ he appeared over the ball, his knees separated and the left side pushed slightly outward towards the target. This gave him the perfect platform for consistency. The following drill will allow you to feel and enjoy the same solidity in your putting posture:

Step 1: Push a cane into the green so that your left knee and hip are pressing softly against it.
Step 2: Maintaining this pressure onto the cane from your left side, rock your shoulders and focus on keeping the lower half stable.
Step 3: Hold your finish for three to four seconds so that you can appreciate your newly-gained stability.
Tactical
1. Learn to run on automatic
Once you have read the line and visualised the ball running all the way into the cup, the secret to turning these images into reality lies in developing a routine that almost runs on auto pilot. What you don’t want to do is return to the ball and then spend an eternity standing over a putt, repeatedly looking up to remind yourself of the line. Much better to see it, set up to it, and then hit it. Australian Aaron Baddeley is a terrific example of a player who exhibits this discipline on the greens – and it’s worth following his example.
- LOOK: Focus intensely and precisely on the line of the ball all the way into the hole
- CALM: Complete your set up, breath out, relax
- STROKE: Without delay make your stroke
- HOLD: Hold your finish with your eyes focused on the track of the ball all the way to the hole
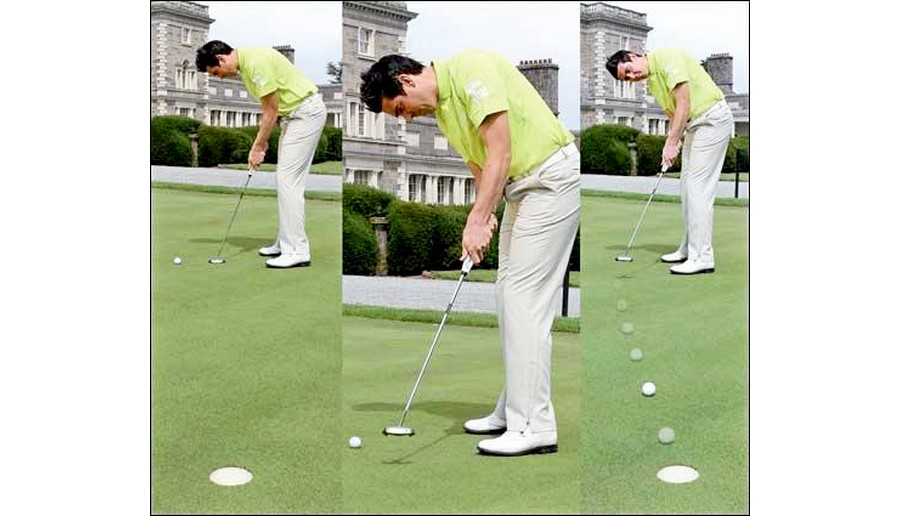
2. What do the pros ‘see’
I question a lot of amateurs on the subject of visualisation. Standing over a putt, what do they ‘see’? Most answers fit into two categories: either (1) they are just concentrating on the hole, or (2) they are looking for where the ball should break from.
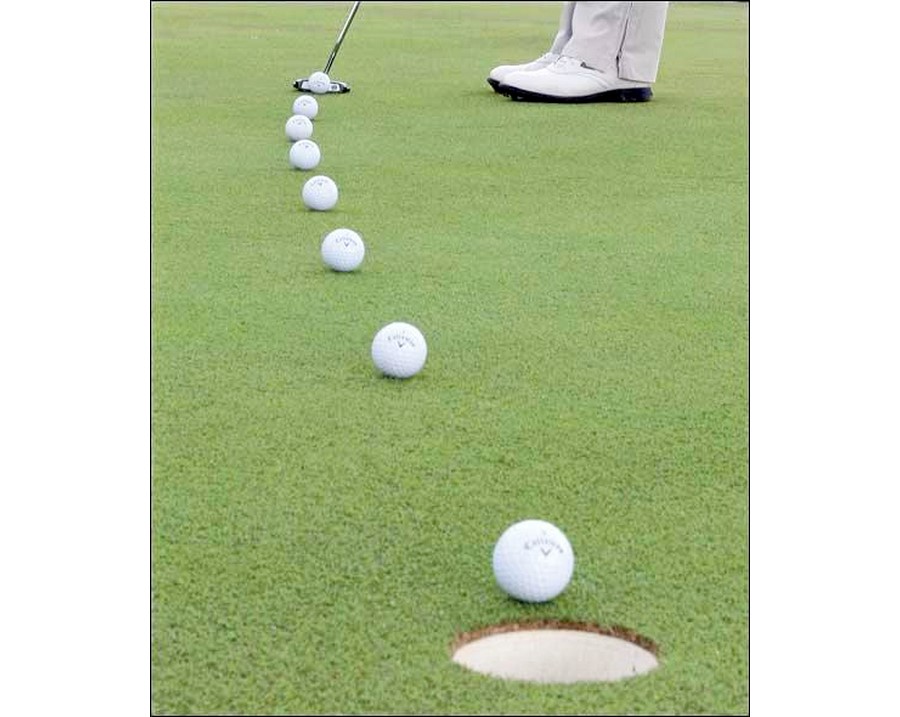
Neither of these responses comes close to resembling what you should see over a putt. If you want to raise your standard you have to see the whole journey to the hole. The photos here illustrate the image a pro has in mind – a trail all the way into the middle of the cup. To be a better putter, add some detail, see the entire journey and believe you can hole every putt.
3. Flow rehearsal drill
‘Flow’ is such a great word for golf. It encourages natural movement, instinct and rhythm. Another word we don’t use very often is ‘rehearsal’. I hear a lot of coaches telling their pupils to ‘make a practice swing’ but very few ever suggest rehearsing what they hope to replicate for real.
That’s the crux of this drill: rather than making a couple of half-hearted practice strokes that have no relationship to the intended task, use your imagination and build a rehearsal flow routine by rolling two imaginary putts before your real one.
Try to do this in one continuous motion, so that you make the two rehearsal strokes back-to-back, all the while with that visualisation in your mind’s eye. Then simple make your actual stroke the third putt in the sequence, repeating the rhythm and flow of the two rehearsals
4. Zone in on specifics
Why is it that certain shape putts seem really easy and others we tend to struggle with? The answer is simple: our subconscious retains memories and forms a default setting/tendency. When working with golfers I soon get a feel that they ‘will’ or ‘won’t’ make certain putts. Not because of the difficulty, but because of their belief and previous evidence of them making a stroke and missing putts. How do you change this default setting?
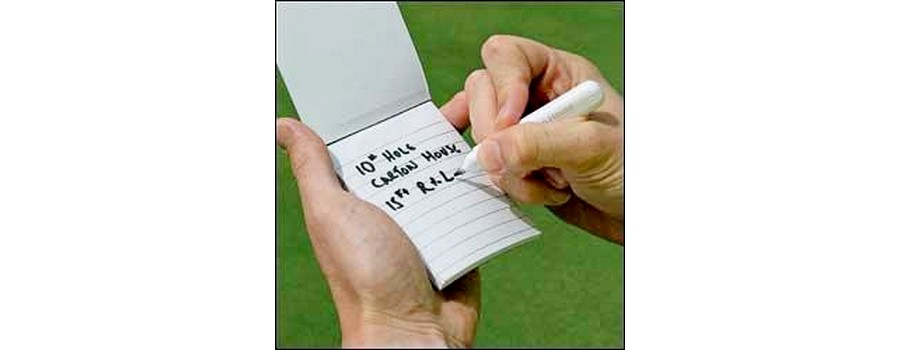
You can make a start by recreating moments from your round and working on specific putts on the practice green. Here, for instance, I’ve made a note of a poor putt that I made on the 10th hole – a 15-foot right-to-left putt that I didn’t commit to striking properly. A simple entry in a note pad provides you with a specific focus later on the practice green. To turn this negative memory into a future positive, all you have to do is follow your process and go to work on rolling the ball in. Hit putt after putt until you are comfortable.
Carrying a note-pad and using it to record highs and lows of your round (in all areas of the game) will gradually reveal the areas which most need your attention allowing you to tailor your practice time accordingly.
Practical
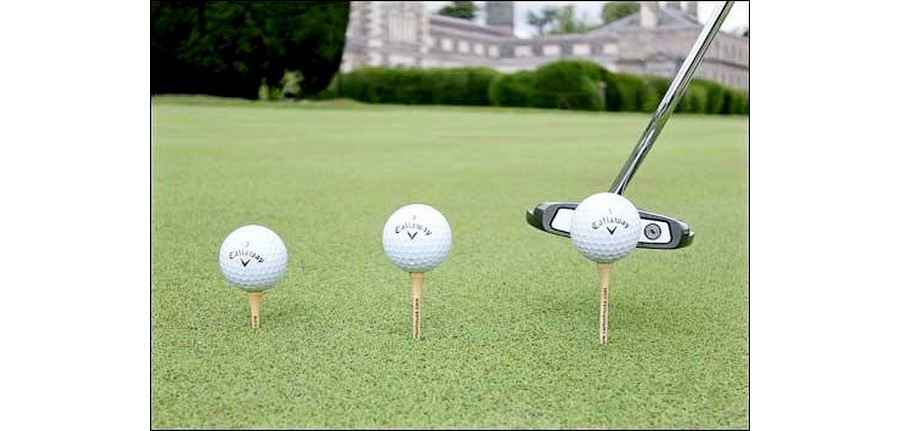
The ‘must-make’ range: 3-6-9
Chances are you have limited practice time, so it makes sense that you focus your attention on putts from 10 foot and in. Why? Because these are the putts that make the most difference to your scorecard. Think about it this way: if you hit a green in regulation your first putt would always finish inside 10 foot (even a bad one!) If you miss a green, 90% of the time you are going to recover to within 10 feet of the hole. And on those occasions when you do set up a great birdie chance… it’s usually 10 feet and in.

No surprise, then, that the pros spend more time grinding their technique from this range than anything else. And there’s an easy way to create a consistent challenge. The average putter is about 36” long and thus makes for a great measuring tool. Simply lay it on the green and use it to measure out three-, six- and nine-foot putts. Start on a flat area of the green and then spice things up with some sloping putts, each time working your way continuously holing from short-to-long. This will create great confidence in an area of the game that really is critical to the bottom line.
Finally, here are some interesting statistics from the PGA Tour 2011 – food for thought as you measure your skills against the best players in the world.
Co-ordination
Let me leave you with a few out-of-left-field drills that can seriously help to sharpen up your levels of balance, rhythm, instinct and general coordination – none of which will do you any harm at all when it comes to rolling a ball into the hole. Go out and test yourself – if you can master all five, then holing putts out on the course will feel easy.

WEDGE PUTT: Practice rolling putts with the leading edge of your wedge. This takes precision and concentration.
ONE-HAND ONLY: Alternate rolling putts one-handed, switch between right and left hand with the opposite hand across your chest. This will improve feel and control.
TEE UP PRECISION: Place three balls on varying heights of tee peg. Attempt to roll the ball without moving the tee. Again this will improve strike precision and focus.
EYES SHUT: Striking putts with your eyes shut will improve your sense of feel and trust in your stroke.
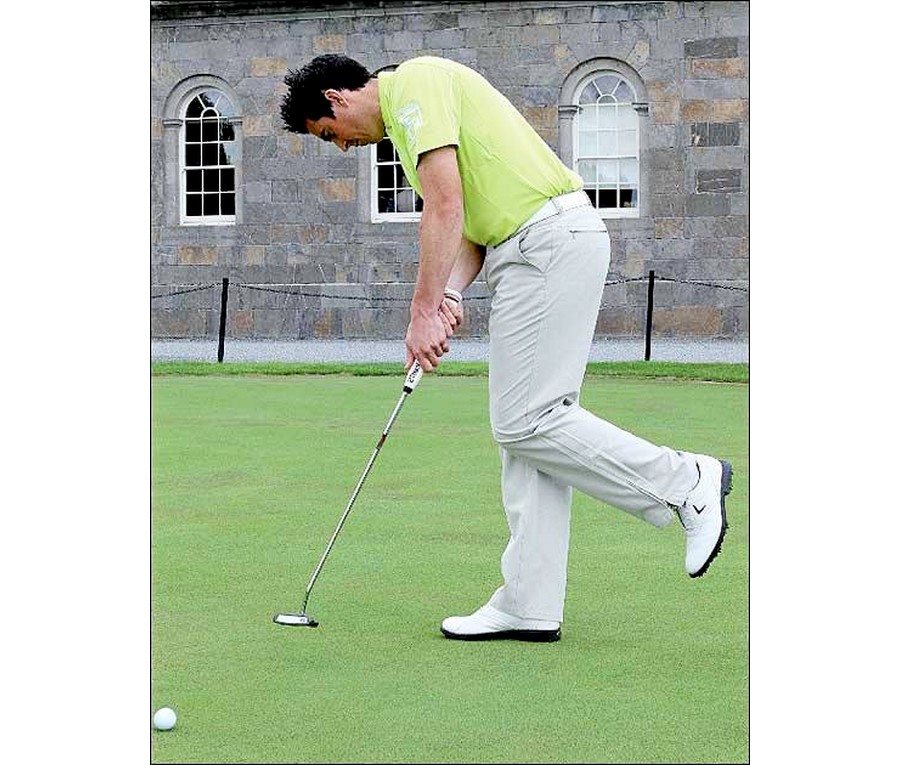
ON ONE FOOT: Try rolling a few putts standing on one foot your other foot raised behind you. This will improve your balance and teach you to control your core.

Simon Bale
The editorial team at Golf Today strives to provide readers with captivating content that celebrates the rich heritage and exciting developments in the world of golf. Their collective expertise and dedication ensure that Golf Today remains a premier destination for golf enthusiasts seeking the latest news, insightful analysis, and engaging stories from the world of golf.