Swing Map – Denis Pugh
by Denis Pugh
Following this network of swing ‘essentials’ is the shortest and most effective route to a better game.
Whether you are a beginner or an accomplished player, if you want to improve you need a route that will allow you to develop your own individual style, at your own pace. And that’s the real crux of this article: rather than trying to force upon you ‘the swing of the moment’, I want you to use the elements of my swing map in a way that best suits you, and change only what is absolutely necessary to play your best golf.
I stress the individuality here. When Nick Faldo was at his peak, he inspired golfers the world over to take lessons and to work on their game, but the potential downside, it seemed to me, was that everyone felt they had to copy his technique. The same thing’s happening today with Tiger Woods. I believe it makes more sense to improve the swing you have. You are never going to swing like a Tiger or Nick Faldo. So be yourself – not a cheap imitation.
Swing Map – Denis Pugh
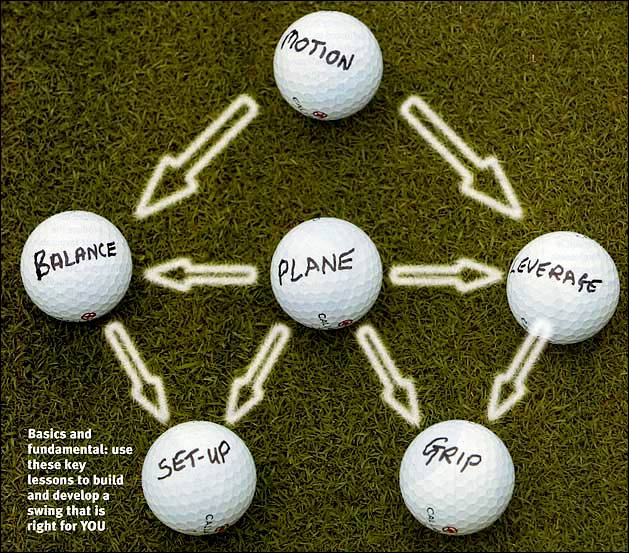
The history of the swing map below is quite simple. About 10 years ago I decided to break down the basics.
What do golfers really need to know?
Swing Map – Denis Pugh
Logic told me you have to hold the club and stand to the ball, so ‘GRIP’ and ‘SET-UP’ became the foundation to the map. My technical knowledge told me that within the swing itself there were generally three main issues teachers come back to: how to use the big muscles (shoulders, hips and knees), which I combined under ‘BALANCE’; co-ordinating the smaller muscles (wrists, forearms and the clubshaft itself) I group together under ‘LEVEARGE’; while the ‘PLAN E’ of the swing deals with the simple fact that we hold the club above the ground, creating a natural shaft angle.
Finally, I needed a term to convey that pervading quality that allows a player to blend together balance, plane and leverage for a consistent swing and solid ball-striking, bearing in mind individual physique and ability? These key ingredients, I believe, are best thought of collectively as the flow of ‘MOTION’.
I cannot think of anything outside this map that you need to be concerned about to find your best game – so let’s get started.
Swing Map – Denis Pugh
The Grip
Your first consideration in the search for a better game
A fairly predictable starting point, but the truth is you cannot begin to play good golf until you appreciate the role of the grip. To achieve the general look you see here, you have to learn how to put your hands on the grip properly (outlined below), and stand to the ball in a manner that facilitates your best swing. As you go about doing this, remember that the grip itself is not a passive thing that has to be taken care of before the swing gets underway but an active instrument that essentially brings a good swing to life.
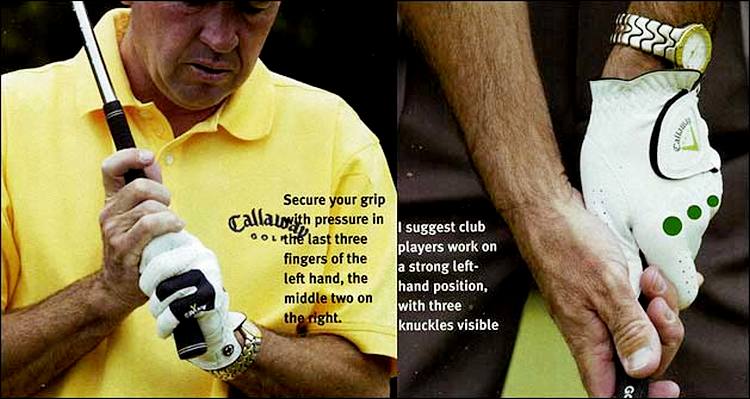
What’s more, keep it in mind that everything in this map is geared towards delivering motion. A good grip enables the wrists to hinge correctly, and thus keeps the club swinging with a fluent rhythm. Grip pressure is key. It has been said many times that the grip should be taken in the fingers and the palm of the left hand, and in the fingers of the right hand, and that’s probably the best advice anyone can give. You really want to sense that the fingers on the left hand press the handle of the club into the palm, thus securing the club. But not too tight!
On a matter of detail, you may also have heard discussions about whether it’s best to have a ‘long’ or a ‘short’ left thumb. My suggestion is that it should be somewhere between the longest you can extend it down the shaft and the shortest you can pull it back up the grip – get it between those two extremes and you will have solved that little problem for life.

Swing Map – Denis Pugh
Neutral-to-strong left hand grip facilitates your best swing
The right hand has three separate functions. It has to join the grip together with the left hand (which we’ll come back to), it has to be secured with the two middle fingers compressing the grip itself, keeping the right palm away from the grip, and it has to offer a great sense of feel through the ‘trigger’ unit.
Should you overlap, interlock or use a baseball-type grip? It really doesn’t matter. The way the hands align on the club is more important than how they form. And it’s interesting to note that more and more golfers on the professional tours are tending towards the stronger grip, in which both the left and right hands are turned slightly more clockwise on the grip (below) to the extent that at least three knuckles are visible on the left hand. Not only is this acceptable, I would suggest it is advisable for the club golfer, as it positively assists forearm rotation in the swing.
Swing Map – Denis Pugh
Culprits you need to be aware of
As it directly accounts for your ability to create a flowing motion, it is vital that you check your grip regularly. Here are two of the more serious faults to be aware of:
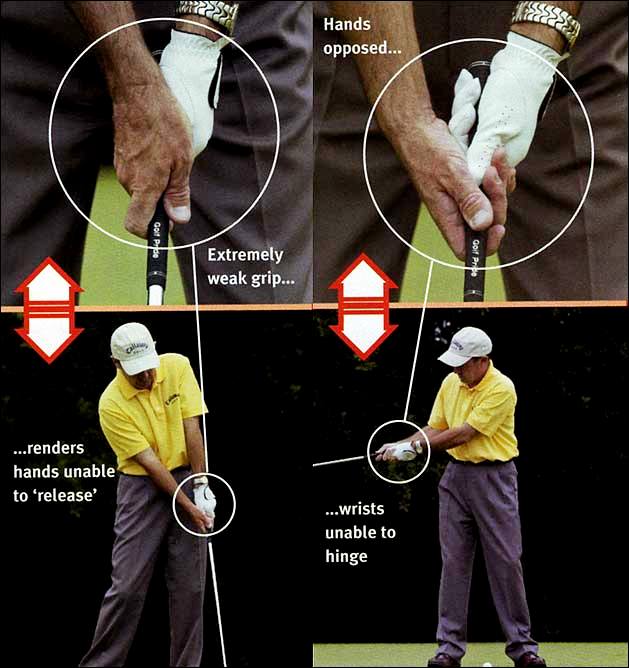
WEAK = NO RELEASE
Here’s a classic example of a grip in which the right hand is turned way too far to the left, smothering the left hand. While this may feel strong, it is actually a very weak right-hand position. And this is absolutely the worse grip fault for better players as it prevents the hands ‘releasing’ properly through impact. It also tends to put too much loft on the clubface, the result often a weak, glancing blow. If you are losing distance, and hitting a lot of high shots to the right, it may well be that your grip is too weak.
TOTALLY AT ODDS
Any time the hands fight each other like this on the grip, the result is a swing that is totally devoid of a good wrist action. So placed, the hands are unable to hinge correctly in the process of making a backswing, and all motion (and speed) is stifled from the word ‘go’. Neither wrist can work properly, and it’s impossible for the club to ‘set’ properly. What ends up happening is the elbows take the break, rather than the wrists, which results in a very short and a very weak backswing. Hold the club like this and you have absolutely no chance of creating a free-flowing swinging motion.
Swing Map – Denis Pugh
The Set Up

Swing Map – Denis Pugh
Guidelines on ball position
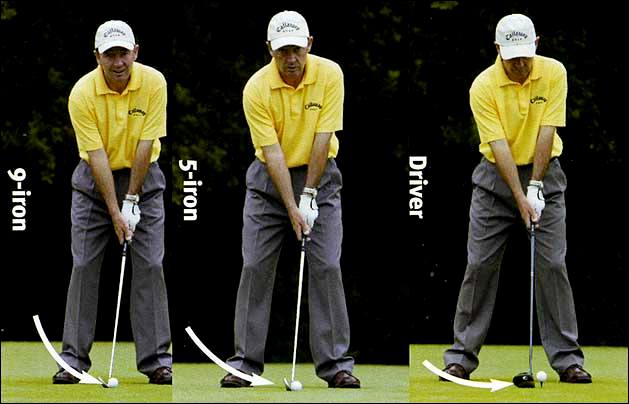
Compare these regular set-ups with a 9-iron, 5-iron and driver. See how the ball position moves slightly in relation to the left heel? Of course, this is partly down to the fact that the width of the stance widens as you work your way down to the longer shafted clubs, but it is also a conscious effort made with the nature of the shot itself very much in mind.
Basically, you can categorise it like this.
With the shorter irons (let’s say wedge through 7-iron), you are aiming to deliver a slightly descending blow, one that creates backspin. To do that you want your hands a little ahead of the ball – hence moving it back towards the middle of your stance. With the mid-to-long irons, you are looking to take the shallowest of divots, the hand position moderated slightly, white with the driver the aim is to catch the ball as the club bottoms out (even, ideally, as it begins its ascent). That being the case, the ball is placed off the left instep, the hands above or even a fraction behind it, ready to sweep it forward.
Weight distribution? For me this is one of the biggest red herrings in golf – that you think about where your weight will be and move through the swing. To swing in balance, you have to start in balance, and I don’t believe that you should ever feel your weight favours one foot more than the other, unless you are playing a shot from an uphill or downhill lie, or a specialist short-game shot. Adjusting your weight more to the right foot for the longer clubs, particularly the driver, is adding too much complexity for me. And it’s unnecessary. I don’t think I’ve ever met a professional who thinks: “I must settle 60% of my weight on my right side.” You can turn properly from an even position. But if you accentuate one side over the other you threaten a good body movement.
Swing Map – Denis Pugh
Set-up culprits to be aware of
Let me introduce you to a couple of fellows you may have seen out and about on the course -‘Sloppy Sam’ and ‘Geometric George’.
Now Sloppy Sam (left) has read that you have to be loose and be natural, and he’s very much of the idea that the set-up is to keep him nice and easy. Sadly, he’s taken it all a bit too far. With that degree of sloppiness, the balance cannot function properly and the motion is sloppy in the swing. Typically, he enjoys no coiling in the backswing, loses his ‘levers’ and finds himself lifting the club with the arms to reach the top. It’s a ‘lift’ and a ‘slap’.
Geometric George is a different animal entirely. He has read that good players create ‘dynamic tension’ in the swing, and he likes the idea. So he has worked hard on creating what he feels is an ‘athletic’ set-up (right). The problem is, it’s not. Such a tight and angular body posture tends to lead to a tight, jerky swing. And while it may well be technically correct in parts, it almost certainly has no flow of motion about it.
The player who suffers this fault – and it’s very common – will inevitably struggle to achieve a full backswing because of the inherent tightness in the set-up position.

Swing Map – Denis Pugh
Balance
Turning your upper body behind the ball in the backswing is always a good swing key. The feeling I want you to have is that you are simply getting your left shoulder over and above your right thigh. Don’t worry about the hips. In the backswing the emphasis is on turning the shoulders (which pull the hips); on the downswing it’s all about the hips then turning and clearing.
If you choose to focus on this element of balance, you need to be aware that from the address position, the shoulders turn the hips to the top, and then the hips turn the shoulders through the ball. Your conscious thought is not to move in stuttery checkpoints but on simply turning the shoulders all the way to the top of the swing. The blur of motion here is intentional. I want to convey that sense of continuity. Following the change of direction, the hips move across and around and the shoulders unwind – that’s the flow of balance in the swing. Be aware that if you disturb that balance you are liable to end up with an empty backswing (i.e. no real ‘coil’). If you unwind your shoulders before you have moved across with your hips you will have a problem coming ‘over the top’ on the way down – a common cause of the slice.

Swing Map – Denis Pugh
Plane
To simplify the issue of plane, think of the left arm swinging over the turning right shoulder to make your backswing, the right arm then swinging over the turning left shoulder to make the through-swing. In other words, focus on making a continuous and reflective motion, a true mirror-image, back and through. The grip and the wrist action itself determines where the clubface is in relation to the plane of the swing, and I prefer this to be natural to the player. The only thing that matters is that you learn to get the club into a consistent position at the top of the swing, the hands over the turning right shoulder and the clubshaft parallel to your intended target.
Don’t worry too much about the exact angle between your left wrist and the clubface. Some of the great golfers of all time have played with a bowed left wrist (Tom Watson for one). Others play from square to slightly closed (e.g. Tiger Woods). Colin Montgomerie has a distinct cupping in the wrists and plays with the toe hanging wide open – and he’s one of the finest ball strikers in the game.

… and you are in plane when left hand/arm goes over the right shoulder
Hips turn and clear…
… club swings up and over left shoulder
Swing Map – Denis Pugh
Leverage
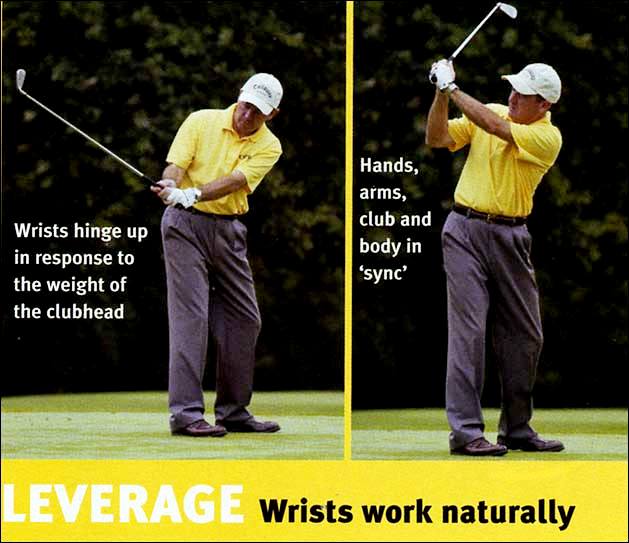
Rather than worrying about checkpoints along the way, remember this: the wrists must be allowed to hinge in response to the swinging arms and the weight of the clubhead. Don’t stand there and think “I must hinge my wrists”. Just let it happen.
In these sequences, the left arm and left shoulder swing together to initiate the swing; the wrists pick up on that motion and the momentum is continued as they hinge. The wrists have simply responded to this movement (thanks to a light grip pressure), making their own hinge as they do so. If the wrists are allowed to respond they will hinge in a way that is natural to you as an individual. It doesn’t matter if they hinge back a little, or open a fraction, providing you don’t try to do anything else in your backswing other than allow the wrists to hinge up as you swing your left arm over your right shoulder. Plane is more important than clubface position. If you aren’t hingeing the wrists you are probably gripping too tight.
Swing Map – Denis Pugh
What does your hinge do?
My feeling is that the details of the backswing position are entirely down to the individual. My map provides the basics and fundamentals (i.e. grip, set-up, balance, plane, leverage and motion etc), and yet different golfers will interpret them differently, and we all arrive at a slightly different position at the top of the backswing.
Unless you want to spend all your time fighting your particular tendency, I think it’s best to accept what you do naturally. No two players are ever identical. Look around and you see great ball-strikers displaying any one of the positions identified above – you simply have to understand your own tendency, and hone it.

Swing Map – Denis Pugh
Developing the “whip” and release
People often ask me: “What’s a good player got that a poor player hasn’t?”, and the answer probably lies right here in the picture immediately after impact -the right hand/forearm release. Take a close look and note the way the right wrist has been allowed to release fully towards the target. This is something good golfers build into their games instinctively by hitting lots of shots, using their minds to picture good swings and trusting the release of the club through the ball to pull it off.
The later you take to this game, the harder it is to develop this trust through impact. If you fall into that category, the exercise above is very useful because it will help you to get the feeling of the arms swinging – both in the backswing and through-swing. Try it as a pre-shot exercise. The key is to make this a practice swing, not a practice position. Make the noise of the swish coincide with the area through impact – “Two turns and a swish”, as John Jacobs once memorably described it all.

Swing Map – Denis Pugh
I don’t like to prescribe a lot of swing drills, but this one (right) can do your game nothing but good. All I am doing here is teeing the ball high and going through the full range of motion, but at different speeds. Take a mid-iron, tee it up quite high, start at what feels like half-speed and gradually build it up. The overall picture here is that the swing is a flowing motion, and not a collection of positions.
For those of you who like to study the golf swing, the recommended reading here would be the classic text Swing the Clubhead by Ernest Jones.
Its all about motion

Swing Map – Denis Pugh
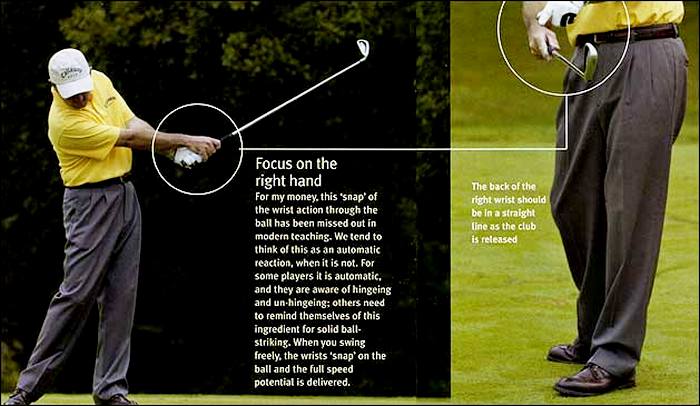
For my money, this ‘snap’ of the wrist action through the ball has been missed out in modern teaching. We tend to think of this as an automatic reaction, when it is not. For some players it is automatic, and they are aware of hingeing and un-hingeing; others need to remind themselves of this ingredient for solid ball-striking. When you swing freely, the wrists ‘snap’ on the ball and the full speed potential is delivered.
Focus on the right hand
Swing Map – Denis Pugh
Some final thoughts on this hand-and-forearm action through the ball.
First, be aware that it’s not enough for the right forearm simply to cross over the left. That does not necessarily guarantee a true release. You have to look at what the back of the right wrist is doing. And, as you can see, it goes into a straighter position just after impact. That confirms that both the forearm and the wrist are fully released -one of the sure-fire keys to solid ball striking.
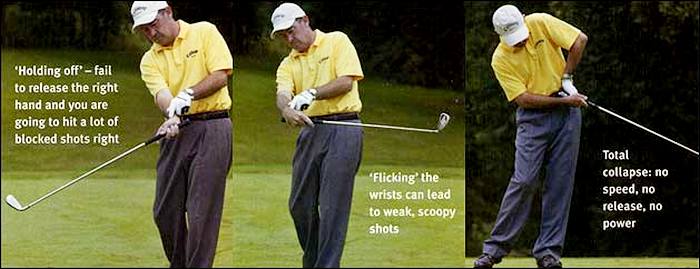
Simply swinging the clubhead backwards and forwards is a terrific way to get a feel for this release in your full swing. Try to feel the crossover in the wrists, and time the thrust of the swish to coincide with the ball. The back of your right wrist should be in a straight line as the club is released – any ‘holding off’ and you will experience shots that drift to the right, or are blocked, and certainly never experience your full power potential.
A common flaw among good players (who are often afraid of hooking) is this delayed release (left), which usually results in a blocked shot to the right. High-handicappers often suffer a similar fate, but they are simply too afraid to let it all go. Two other faults can often be attributed to a poor body action – the ‘flick’ of the wrists (centre) and the classic ‘crumple’ (right), reflecting a lack of real zest in the body motion, and no clubhead speed through the ball.
Using the right hand ‘whip’ correctly
Swing Map – Denis Pugh
Originally posted in 2014