
Green reading and pace control – the complementary skills you need to become an all-round good putter
By Jeremy Bennett

Let me start with a visual challenge. Study the FedEx logo here above – do you spot anything unusual about it? There’s a hidden surprise – can you see it? (For those of you who haven’t seen this before, the answer is at the end of the feature.)
The point I am trying to make here is that the information is there for all to see…if you know what to look for – and the same is true when it comes to reading a putt on a green. Golf would be a dull game indeed if the putting surfaces were totally flat, and the art of reading a putt is one of the great skills that is learned through experience – and one that can be improved with practice.
Of course, reading a green and identifying a line to the hole is only a part of the equation: in order to roll your ball on that chosen line you have to be able to align the putterface and return it squarely to the ball in order to have absolute control of the initial direction of the putt. Once you have that, you can then work on your ability to control pace – a vital component of every putt.
Before we go on to explore strategy on the green, and look at certain drills designed to help you improve your visualisation skills, it’s worth bearing in mind that your self-conscious will, to a certain extent, try to recover any tendency you might have to over- or under-read a putt, leading either to a push or a pull in the shape of the stroke in an effort to counteract (i.e. open or close) the putterface. I’d say the vast majority of amateurs suffer this problem – a compensating stroke that can never be consistent. And that is why I like to spend the first half-hour of every putting lesson assessing a player’s ability to read a green accurately before moving on to look at the technique necessary to start the ball on that chosen line.
Learn from the good habits of others The world’s best putters do not just have effective and consistent mechanics but are undoubtedly the world’s best green readers. This doesn’t come about by accident. Look at a player like Ian Poulter, one of the finest putters in golf, and you discover that at least half of his practice time is dedicated to the art of reading a green, to starting the ball precisely on line and honing control of pace.
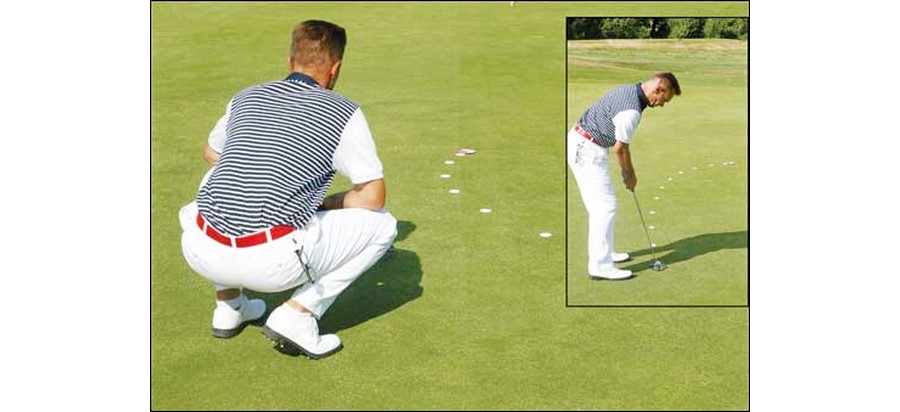
This is an area of the game in which club golfers can learn so much from the pros – and there are no physical barriers to improvement. Study the way a good player stalks a putt, gathering all relevant information so that he or she can visualise the line to the hole. Typically, a player will start with a good look from directly behind the ball, stepping five or six paces back, and get down as low as possible to scrutinise the path to the hole.
What is your first impression? Could it possibly be straight? If not, what do you feel is the maximum amount of break it could be? Use the results of this initial survey to identify a line halfway between a straight putt and one taking the maximum break – use that as your starting point.
Next, turn your attention to the orientation of the green between ball and hole. Walk to the low side of the putt and crouch down halfway along the line, so that your position creates an equilateral triangle, the ball and the hole being the other two points of it. Paint in your mind’s eye a clear visual of the line you have initially identified as it runs on the green – make it appear as is if it were drawn with a giant colouring pencil on the green.
A useful tip is to break the putt down into two parts: the first part of the journey is the straight line the ball initially starts on, directly to the apex (or aim point) of the putt; the second is then where gravity and the break of the putt combine to swing the ball toward the hole – the slower part of the journey.
In putting the whole picture together, you also need to identify the profile of a putt – i.e. whether the putt goes uphill then downhill, or downhill then uphill. In some cases it could be downhill…and then even more downhill! Or uphill and then really uphill! It all adds to the fun – and challenge – of reading a putt.
‘Go to school’ on your putt – See it before you roll it
Bear in mind that whenever the second part of a putt is downhill it break considerably more than if it were on the level.
One of the tips I give my students is to assess, overall, whether a putt is slower or quicker than a totally flat putt. This is very important, because it’s easy to be deceived looking directly down a line, or from above the ball as you stand over it at the set-up. How often have you hit a putt that took off on you – a downhill putt you thought was slightly uphill? This is why it’s vital you take a look from the low side to establish the overall profile of a putt – and eliminate nasty surprises!
Believe it or not, the elements play a part in all this, too. How strong is the wind, if there is any?
In which direction is it blowing? If it is blowing directly with the slope, and in the direction you see the ball breaking, a two-club wind could add as much as 25% to the borrow required – so a three-inch break becomes four. This really comes into effect on fast, firm greens that are exposed (links golf especially). Should the wind direction be against the line of a putt, or holding the ball up the slope, the affect is still there, but marginal.
One last point: watch top pros going through their routine and you will often see them walk right up to the hole and take a good look around it, to get a clear picture of the way the ball will react as it slows and also to identify the angle at which the hole is cut. And one of the tricks here is to establish how fast or how slow a putt is beyond the hole (up to about three feet past the cup). This will have a bearing on the speed at which you run the ball to the hole – if there is a significant slope past the hole there is the danger of the ball running away from you and leaving a tough return; in this situation, play smart, and er on the gentle side, dropping the ball in the front of the cup. On the other hand, if the green runs uphill beyond the hole, you have the green light to be that much more aggressive.
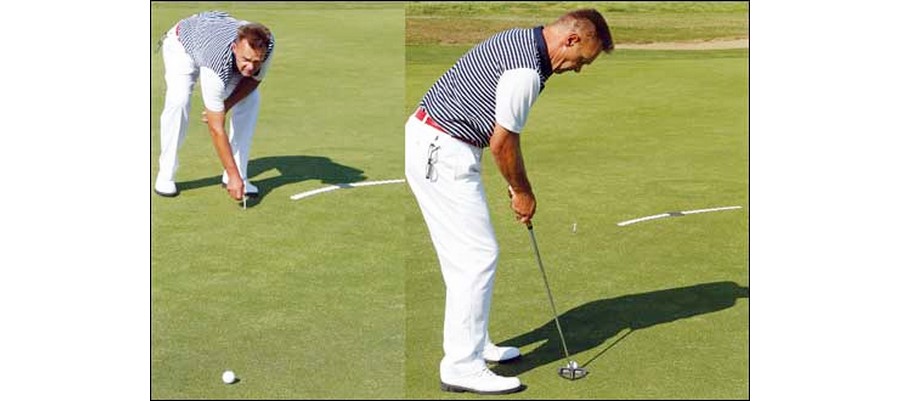
Placing a tee at the apex will help you to appreciate the true break required at a pace that would see the ball finish two feet beyond the cup
Once you have established your aim point, it’s all about your ability to align the putter-face squarely to the ball on that line and then repeat the stroke that produces the desired pace – train it, and you will learn to trust it
This brings us to an element of green reading that is often overlooked, and that is identifying the exact part of the hole you visualise the ball entering as it hones in on the cup. For instance, if the putt is breaking from left to right, forget the right half of the cup – anything running toward that half is likely to lip out unless it is rolling at the perfect pace. Focus only on the top half – visualise it as being highlighted in red (as you see illustrated in the photograph above). If you were to simply make doing that your goal on every breaking putt, you will be more successful.
To further enhance this aspect of your visualisation technique, imagine where the ball would finish if it were to run right over the middle of the hole at the perfect pace – i.e. that which would see it finish about two feet beyond the cup (as I am doing here in the photo above). Once you have this image fixed in your mind, rewind the line back to identify precisely where the ball needs to be running as it approaches the cup, the final three feet of its journey to the hole. The key then is to match up the first part of the putt so that you get the ball onto this path for those final, critical, three feet or so into the hole.
If the putt is a double-breaker, pay much more attention to the second part of the putt as it slows down. This is where judging pace becomes the critical element of the ‘read’; for instance, if you face a 20-foot putt and what break there is occurs over the first 10 feet, the remainder being flat, you have to recognise that rolling the ball at the speed to reach the hole will lessen the effect of that break over the initial length of the journey. So, while the break may read four inches on the initial 10 feet of the putt, because you need to roll the ball with the pace to travel twice that distance, the actual break could be half that amount.
Summary of key points:
A condensed guide to green-reading…
Clearly there is a lot of information here to digest – and it’s certainly not practical to take it all onboard at once and expect to go out and put it into practice. Much better to take two or three of the points raised and incorporate them into your routine, so that you begin to think and operate like a pro. The more you practice, the better you will get at reading the subtle borrows that exist and visualising the line and the pace of a putt.
As a drill, I like to encourage my students to run through the following checklist, and then hit putts with the objective of leaving the ball on the topside of the hole and as close to it as possible without dropping – that’s a great way to train your eyes to see maximum break.
So, having here’s the basic checklist:
- Firstly, walk right up to the hole and visualise exactly where the ball needs to enter the hole in order to finish two feet beyond the cup
- Ask yourself the key question: where do you need to start the ball in order for it to take the break and curve onto the path that crosses that entrance point as it slows?
- Looking from the low side (like standing on a beach looking up at a cliff) establish the profile of the putt – i.e. whether, overall, you are putting uphill or downhill to gauge the overall pace.
- Finally, crouching behind your ball, reconfirm how much borrow will be needed to start your ball high enough to enter the top half of the cup.
And remember…
The PACE will have four times more influence on the amount of BREAK than the amount of SIDE SLOPE. Thus a putt on a small side slope can end up breaking a considerable amount on a very fast firm surface.
Back in my days on the European Tour I used to spend as much time as I could on the putting green, inventing drills and exercises that would not only help me to improve all aspects of my putting skills but make doing so fun and enjoyable.
Last issue I presented several ideas designed to help you check and improve key elements of the set up and alignment that reward you with the ability to start the ball on your chosen line. That is absolutely critical to your success on the green – and whatever else you do over the winter months, improving your aim and the quality of your stroke will reap huge benefits in the New Year.
So how do you then go about devising a practice routine that will specifically improve your perception of line, your ‘feel’ for the pace of breaking putts of various distance and the confidence to swing and release the putter to start your ball on a chosen aim point?
Well, here is a selection to get you started. Whether you use just a couple or all of these ideas, the more time you can find to rehearse them, the better and more intuitive your actions will be on the green.
DIY SOS! Raise your awareness with string…
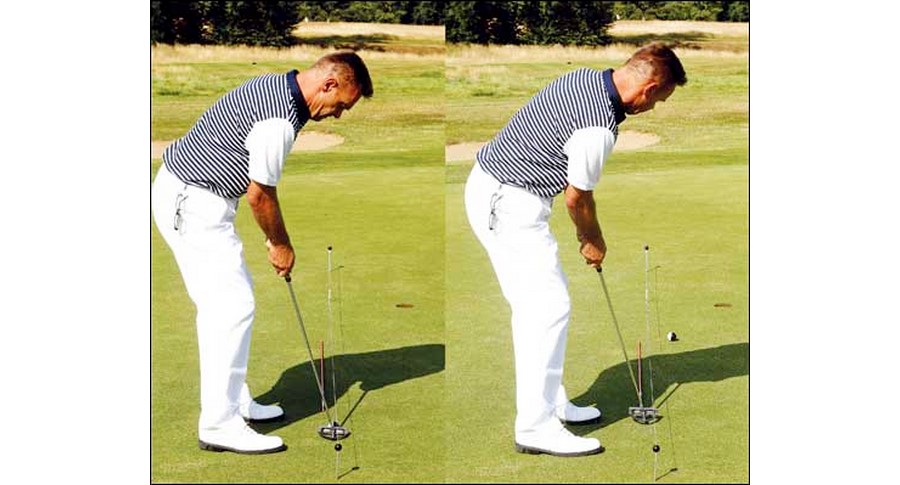
Not only will it help you to align the ball and square the putter-face at set-up, it will enable you to observe the path of your stroke as you swing back and thorugh
First up, the string drill (above). All you need for this are a couple of skewers and a length of string – and there you have it: a simple DIY job that provides invaluable feedback when you pratice. Find a breaking putt, study it for a couple of minutes, identify your line and mark it with a tee. Then stick the pegs in the green and pull the string tight so that it runs directly over the centre of the ball to that aim point.
The bonus of using a length of elasticated string raised a few inches above the line of the putt is that you immediately see whether the ball is aligned correctly beneath it (if you don’t already use a Sharpie to mark a line on your ball, try it and see how effective it is). The two-tone ball that I am using also makes for a brilliant visual guide, as not only do the two distinct spheres make it easy to line up, but the feedback it gives you reveals the quality of the strike – any putt that is not struck with a square clubface will be revealsed as the ball wobbles off line.
A chalk line is another invaluable tool – it’s a compulsory item in the golf bags of the players I coach. Use it to confirm your alignment at set up and the initial direction of the ball – a drill you can and should try to rehearse at home through the offseason.
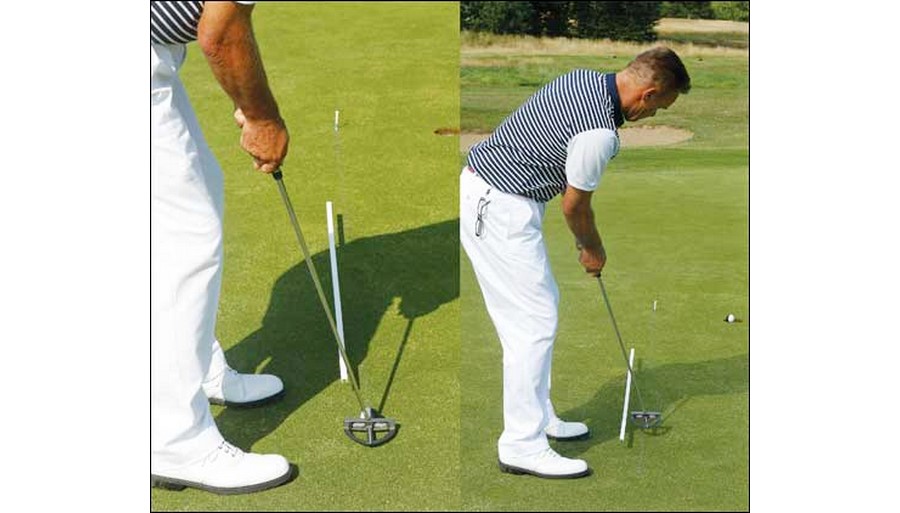
The length of plastic strip here is suspended on a couple of tee pegs, and acts as a raised‘blocker’, preventing me pull the putt left of the true line
In the photo above you can just make out the feint blue chalk line that is running straight at the tee-peg (my aim point); repeatedly knocking in putts from this sort of distance builds your confidence for releasing the ball on the right line and at the correct speed to run into the precise quadrant of the hole, just as you visualise it.
Another good training device is the Raised Blocker, which you see in the same photo. Again, this is something you can make easily with a relatively inexpensive trip to your local DIY store. All you need is a four-foot length of plastic rail, a curtain rod or some such product, which you can then suspend an inch or so above the surface of the green with a few tee pegs.
When placed correctly it will give you instant feedback as to the quality of your stroke through the putt – specifically, in this instance, whether or not you have a tendency to pull across to the left post impact. I see countless players who do this in a subconscious effort to start the ball higher up the slope than their actual read – a common fault, and one that stems from a tendency to under-read breaking putts (particularly left-to-right breaking putts, speaking for the right-handed player).
Rhythm & pace control
Pace – being able to roll the ball at the pace you desire is all important, especially on sloping greens. Opinion varies on what is the perfect weight of a putt but anything that would see the ball finish between 18 inches and two feet beyond the hole is in the right ball park. Any slower than this on a less than perfect surfaces and the ball simply will not hold its line – and is susceptible to imperfections and indentations in the green that multiply during the course of a day’s play. On the other hand, if your pace tends to be on the firm side from inside, say, 10-15 feet, you effectively shrink the size of the hole and are liable to experience frequent lip-outs.

The length of plastic strip here is suspended on a couple of tee pegs, and acts as a raised‘blocker’, preventing me pull the putt left of the true line
Things get a whole lot more complicated when slope is added to the equation – the speed of your ball must now match up with the amount of break you need to factor in, and of course the two are related. The harder you hit a putt, the less it will be affected by slope; if you tend to come up a little shy of the hole, your ball will fall off line early and be destined to finish on the ‘amateur’ side of the hole (a good tip here is to ignore the front of the hole and focus on a point 18 inches beyond it as you make your practice stroke).
The quality and consistency of your rhythm also plays a big part in determining your ability to roll the ball at your chosen pace: too slow during the backstroke and you are likely to rush the downstroke; too quick taking it back and you are likely to decelerate on the way down. A great way to improve the flow of your stroke is simply to imagine the shaft of your putter is ultrabrittle – like an an icicle – and the only way to keep it intact is to swing it smoothly back and through – no sudden acceleration.
Another idea would be to use PowerLines (numbered to help you create a frame of reference), or tee-pegs to mark the desired length of backswing and through-swing (illustrated opposite). I advocate a stroke that sees the backswing fractionally shorter than the follow-through, and to further enhance the quality of flow as you work back and forth, try grading yourself out of 5 for a seamless back-and-through tempo. Perhaps speak the words ‘shoulders this way, shoulders that way’ as you repeat your stroke. That has a nice tempo to it. You could also try humming to yourself – the idea being to maintain a consistent level through the duration of your stroke.
Pace control drill: Play ‘front-middle-back’
One of my all-time favourite drills: from four feet, take 3 balls and putt to a cut-out hole with the intention of having the first putt hit the back of the cup, firm; stroke the second so that it would drop right in the middle, and then third at a snail’s pace that barely tips through the front door. The result should look like this (below). Then move across to the real hole and go through the same drill, holing all three balls at the three different speeds (down the chalk line). Be clear that the pace of the stroke never varies, only the length. In other words, rhythm is the common denominator – it’s only the length of the stroke that varies. Once you have achieved that, move back a couple of feet, and repeat. You get the gist – as you move further away, so your skills of reading the line and judging pace are tested to the limit.

It’s good discipline to experiment with pace when it comes to holing out. When putting uphill or across slopes on soft bumpy greens it may be better to roll your putt 3 foot past (as it holds its line better) than 18 inches. The amount of break less for firmer putt is not as much as most players think, roughly 10%, so if you feel the amount of break is 10 inches and you like to finish it 18 inches past the hole, then only allow 9 inches for a 3-foot past the hole pace!
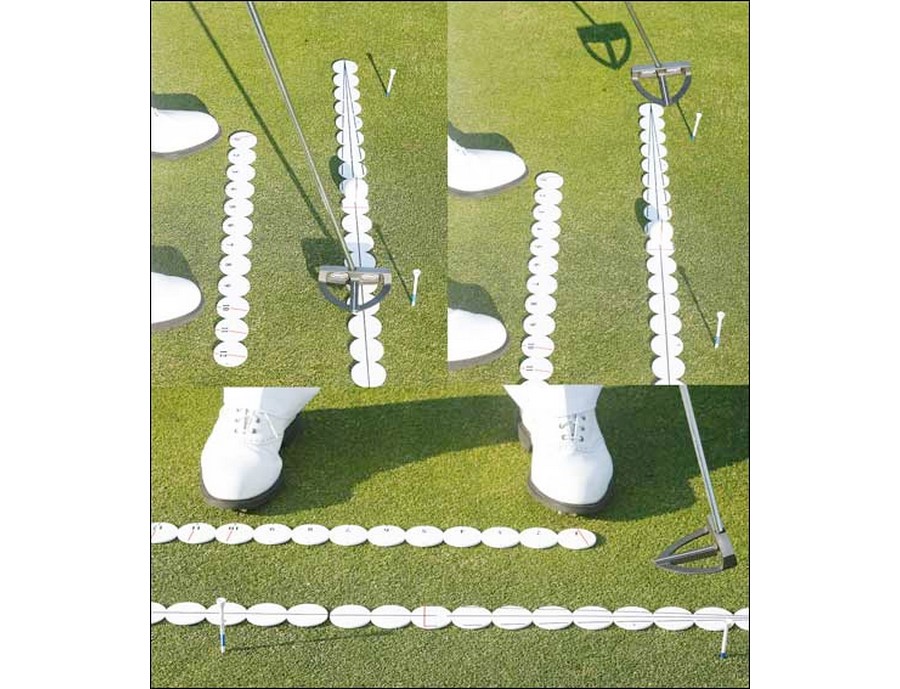
The appropriate length of stroke is vital. Some players who like to ‘pop’ their putts like Brandt Snedeker will have a follow-through that is similar in length to their backswing. But generally the best putters in the game are more ‘swingers’ of the putter (think Crenshaw, Faxon, Tiger and Poulter) and have a follow-through that may be twice as long as their backswing. Be clear which category you fit into, then make sure your length is appropriate to you. The photos here illustrate me putting on the PowerLines with a 25% bias on the length of the follow-through, placing tees as a reference. Experiment by going 3 balls back and 5 through in a consistent rhythm and see how far the ball rolls.
Putting it all together…
If you can consistently align your ball correctly, aim your putter-face squarely to it, strike the ball out of the middle of the face and start it on your intended line – and with the correct pace – well, you are on the way to becoming a great, great putter! You have every base covered in terms of those elements of putting you can control – and every right to be confident in your ability. Reading a breaking putt is not an exact science, and once you have set the ball on its way it is susceptible to the ‘rub of the green’ – that’s golf! But I hope the ideas I have highlighted, both in the previous issue and this time, give you some food for thought, and a practical checklist that will enable you to work effectively on improving your putting skills. I use the checklist you see here in my coaching, as it provides a systemmatic process players can work through with a practice partner to finetune those elements we can control. A tick in the box and you move on to the next test – a ‘X’ tells you where you need to focus your attention.
For those of you who didn’t spot it the answer is the hidden arrow between the Ex. Now you know, you’ll see it straight away every time!

Simon Bale
The editorial team at Golf Today strives to provide readers with captivating content that celebrates the rich heritage and exciting developments in the world of golf. Their collective expertise and dedication ensure that Golf Today remains a premier destination for golf enthusiasts seeking the latest news, insightful analysis, and engaging stories from the world of golf.